10 Essential Camping Knots You'll Actually Use
- 1 day ago
- 8 min read
After years of seeing up camps, typing things down, securing loads, and more, I've found that 99% of the time I end up only using a few different knots. There are great books that will teach you hundreds of different knots, each unique for it's own purpose. There's nothing wrong with this approach, but if you don't have the time to sit around learning all of them, these 10 are all you really need.
They don't cover every possible situation. If you are rock climbing, rappelling, mountaineering, or doing anything where failure can kill or seriously injury you, use purpose-built knots, proper gear, and professional training.
Essential Camping Knots

I've added a short video under each knot and a full length, more detailed video just below the Jump Ahead section. Now go grab a couple ropes and become a tying wizard.
Jump Ahead
Basic Rope Terms
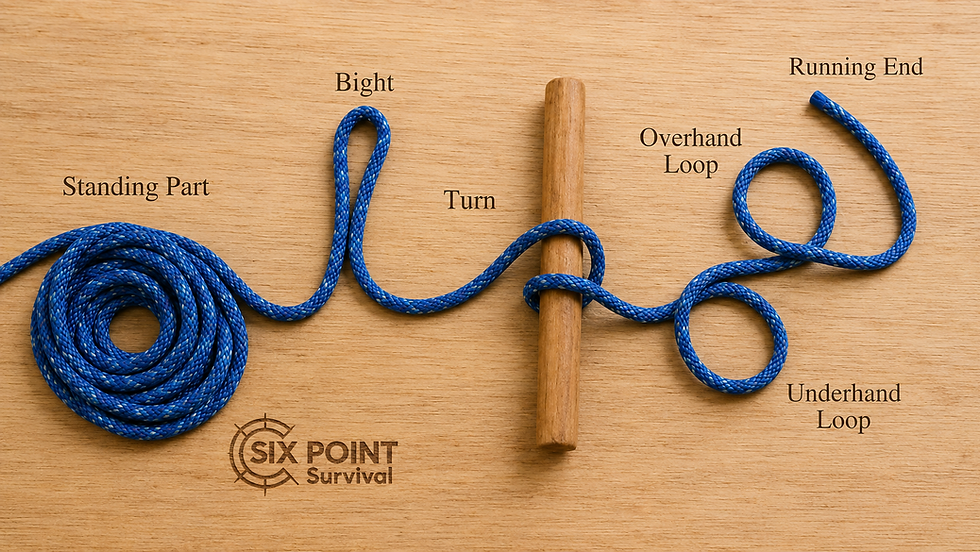
Before tying knots, it helps to understand the terms. This keeps instruction simple and prevents the “put the thing through the other thing” style of teaching. Very technical.
Running End or Working End
This is the end of the rope you are actively moving, wrapping, or tying with.
Body or Standing Part
This is the longer section of rope that is not being actively manipulated.
Overhand Loop
A loop made when the working end passes over the body of the rope.
Underhand Loop
A loop made when the working end passes under the body of the rope.
Bight
A bend in the rope. You do not cross the ends. You simply fold the rope back on itself.
Turn
A turn is made when the rope wraps around another rope or an object.
Knot vs Hitch
Knot - ties rope to rope.
Hitch - ties rope to an object.

That distinction is not something to lose sleep over, but it helps when learning why certain knots behave differently.
Square Knot
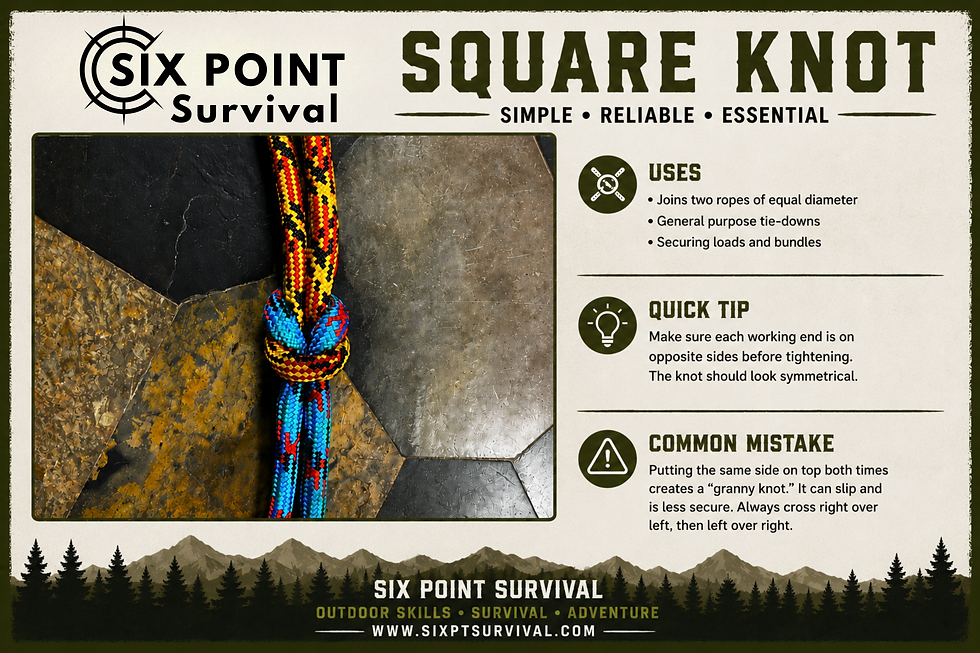
The square knot is used to join two lines of similar size. It is simple, fast, and easy to untie when tied correctly.
Best use
Joining two similar-sized ropes
How to Tie a Square Knot
Take the left working end over the right working end.
Make one turn.
Now take the right working end over the left working end.
Make the second turn.
Pull both standing parts evenly to dress the knot.
The easiest way to remember it
Same line on top both times.
Left over right.
Right over left.
Common Mistakes
Same side on top both time
Short tails
Using lines of different diameter
How to Untie It
Grab the body and working end on the same side of the knot.
Pull them away from each other.
The knot should pop loose.
Once it breaks open, pull the lines apart.
Slip Loop

The slip loop (slip knot) is one of the most useful knots you can learn because it serves as the foundation for several other knots. It tightens when pulled from one side and releases quickly when pulled from the other.
Best use
Temporary loops, quick-release systems, starting other knots shelter and camp setup
How to Tie a Slip Loop
Start with an underhand loop.
Make a bight in the body.
Pull the bight up through the loop.
Pull the standing part to tighten the knot.
One side should slide while the other side tightens the loop.
Common Mistakes
Pulling the wrong section and collapsing the loop before the knot is fully formed.
Putting the bight through the wrong side of the loop.
How to Untie It
Grab the working end and the body of the rope.
Pull them apart.
The knot should release immediately.
Bowline

The bowline creates a fixed loop that will not tighten down under normal tension. It is one of the most useful outdoor knots because it gives you a secure loop that is easy to untie later.
Best use
Tying a fixed loop that is easy to tie and untie
How to Tie a Bowline
Start with a slip loop.
Pass the working end through the slip loop (don't over tighten the slip knot)
Fold the working end back on itself.
Pinch the working end against itself.
Pull the standing part of the rope.
The knot should snap into place and form a fixed loop.
Common Mistakes
Tightening the base of the slip loop before finishing the knot.
Making the slip loop too small to work with comfortably.
Leaving the final tail too short.
How to Untie It
Push the collar of the knot backward.
Loosen the working end.
Pull the loop free.
Overhand Knot

The overhand knot is one of the simplest knots you can tie. It is most often used as a stopper knot or a quick safety knot.
Best use
Stopper knot
Backup knot
Simple safety
Marking the end of a line
How to Tie an overhand knot
Make an overhand loop.
Run the working end through the center of the loop.
Pull tight.
Common Mistakes
Using it for everything. Pulling it too tight under heavy load, which can make it hard to untie. Using it where a stronger or more specific knot is needed.
How to Untie It
Push the knot back toward itself to loosen the tension.
Work the crossing point open with your fingers.
Pull the working end back through.
Truckers Hitch

The trucker's hitch is one of the best knots for creating tension. It is especially useful for tarps, ridgelines, shelter lines, and securing gear.
Best use
Ridgelines
Shelter lines
Securing loads
Tensioning cordage
How to Tie a Trucker's Hitch
Wrap the line around your anchor point.
Pull the line tight and pinch it where the lines come together.
Make a slip loop in the standing part of the rope.
Pull the slip loop bight to tighten the system.
Secure it with a half hitch or safety knot.
Common Mistakes
Not securing the hitch after tensioning it.
Making the slip loop too loose.
Pinching too far from the line intersection.
Placing the slip loop too far from the anchor point.
Pulling the wrong strand and releasing the tension by accident.
How to Untie It
Remove the safety hitch first.
Pull the working end to release the slip loop.
The whole system should loosen quickly.
Girth Hitch

The girth hitch is a quick way to attach cordage to another line, a tarp grommet, a poncho eyelet, a ring, or another fixed point. It is simple, fast, and easy to remove.
Best use
Attaching cordage to tarps
Connecting line to grommets
Quick connections
How to Tie a Girth Hitch
Make a bight near the end of a the rope.
Pass the bight through or around the attachment point.
Bring the working end and standing part through the bight.
Pull both ends tight.
Common Mistakes
Not pulling both strands evenly.
Leaving the hitch loose instead of cinching it tight.
Using on an item without any friction.
How to Untie It
Push the hitch back toward the attachment point.
Pull the working end and standing part back through the bight.
Remove the rope from the object.
Daisy Chain

The daisy chain is used to organize cordage so it does not turn into a tangled mess in your pack. It is basically a series of slip loops that can be pulled apart quickly when you need the rope again.
Best use
Storing and organize rope
Preventing tangles
Packing multiple lines
How to Tie a Daisy Chain
Find the ends of your lines.
Make a slip loop using all lines.
Reach through the slip loop and pull a bight of all ropes through.
Reach through the new loop and pull another bight through.
Continue this pattern down the ropes.
Pull the final section through loosely to finish it.
Common Mistakes
Pulling the final section too tight.
Letting the rope twist as you work down the line.
How to Untie It
Go to the end where you finished.
Pull the two loose lines out.
Pull the rope.
Each loop should release in order.
Sheet Bend

The sheet bend is used to join two ropes of different sizes or to tie rope to fabric, like a tarp, blanket, or sheet. This is the knot to use when a square knot is not the right choice.
Best use
Joining different-sized ropes
Tying rope to fabric
Attaching line to a tarp without a grommet
How to Tie a Sheet Bend
Make a bight in the larger rope, tarp, blanket, or sheet.
Pass the smaller rope through the bight.
Wrap the smaller rope around the back of the bight.
Pass the working end underneath itself.
Tighten slowly and dress the knot into place.
Common Mistakes
Not dressing the knot before loading it.
Pulling it tight too quickly.
Letting the knot roll off the top of the fabric or bight.
How to Untie It
Loosen the smaller rope where it passes under itself.
Open the wrap around the bight.
Pull the smaller rope free.
Half Hitch

The half hitch is a simple way to secure rope around an object. It is often used as a finishing knot, backup knot, or part of a larger system.
Best use
Securing line to an object
Finishing other knots
Adding safety
Temporary attachment
How to Tie a Half Hitch
Wrap the line around an object.
Bring the working end under the standing part.
Pass the working end through the loop you created.
Pull tight.
Repeat as needed for extra security.
Common Mistakes
Trusting one half hitch for too much.
Leaving slack between hitches.
Using it alone when the connection needs to be stronger.
How to Untie It
Push the hitch back toward the object to loosen it.
Pull the working end back through.
If you tied multiple half hitches, remove them in reverse order.
Clove Hitch
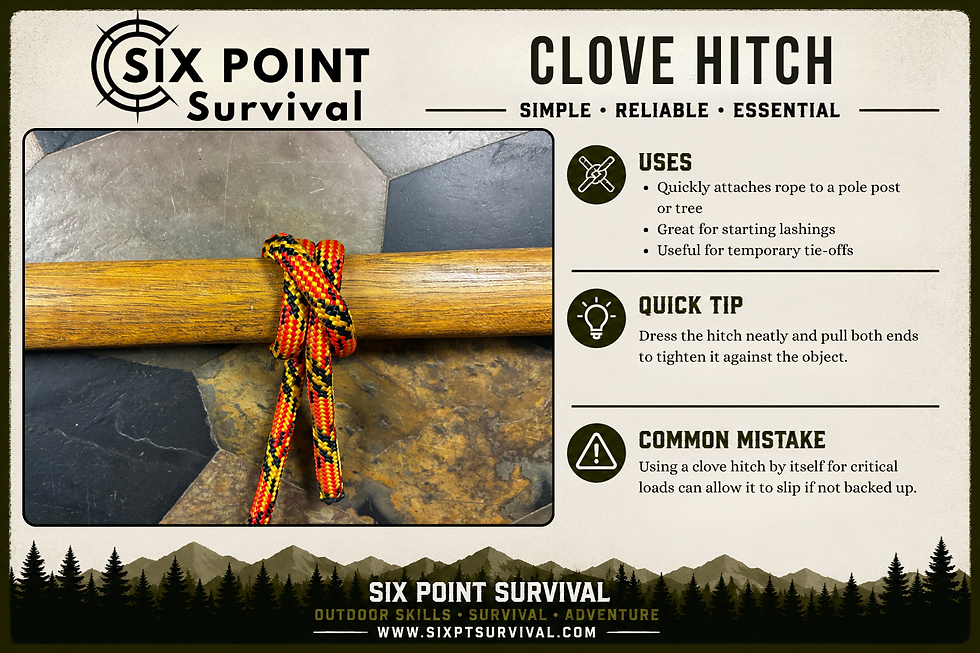
The clove hitch is a fast way to attach rope to an object like a pole, tree, post, or stake. It is quick to tie, easy to adjust, and useful for camp setup.
Best use
Tying line to a pole
Starting shelter setups
Lashing start and finishing
Secure to an improvised steak
How to Tie a Clove Hitch
Wrap the rope around the object one time.
Bring the rope around a second time, crossing over the first wrap.
Pass the working end under the most recent wrap.
Pull tight.
Common Mistakes
Not crossing over the first wrap.
Leaving the hitch loose.
Using it where shifting tension may cause it to loosen.
Tying to something without friction
How to Untie It
Pull slack into the working end.
Loosen the crossing wrap.
Slide the hitch off the object or unwrap it in reverse.
Gear Guide
These supplies either will help you prep your lines or something you can use the knots on while setting up camp. Happy camping!
Paracord: This is line that is cheap per foot.
Pocket Knife: A good knife is alwys helpful to keep on hand for when you need to cut some cord.
Lantern: This rechargable little lantern is my absolute favorite
Tarp: Great for a quick shade or overnight shelter
Hot Knife: Cut, melt, and prep your lines perfect every time.
Water Filter Bag: Now you can hang it up anywhere with a limb

Want More?
If you found this guide helpful, there’s plenty more to learn. Subscribe to our Six Point Survival Newsletter for monthly tips and field-tested gear advice, and check out our YouTube channel for real-world demos and survival lessons.
Your support keeps Six Point Survival running — and trust me, caffeine is cheaper than therapy.
~ Micah Gillette
Donate to our Coffee Fund Now


Comments